
When your GE dishwasher won’t fill with water, or fills too slowly, the culprit is often a faulty water inlet valve. This small but critical component controls the flow of water into the appliance, and when it fails, your dishes stay dirty. Fortunately, diagnosing and replacing a GE dishwasher inlet valve is a manageable DIY repair that can save the cost of a service call. This guide walks through testing, selecting the right replacement part, and completing the swap safely and efficiently. Whether it’s your first appliance repair or your tenth, you’ll have everything you need to restore your dishwasher’s performance.
Table of Contents
ToggleKey Takeaways
- A GE dishwasher water inlet valve controls water flow into the appliance and can be tested and replaced by homeowners in 30–60 minutes, saving the cost of a service call.
- Common failure signs include no water fill, slow filling, continuous overflow, leaks from the valve body, and humming with no water flow, which warrant testing before replacement.
- Test the valve using visual inspection of the inlet screen for sediment, an electrical continuity test on the solenoid coil (reading 500–1,500 ohms for a healthy valve), and a water flow test to confirm proper function.
- Match the replacement GE dishwasher water inlet valve by model number, choosing between OEM (pricier, guaranteed fit) or aftermarket options, and verify single vs. dual solenoid configuration and 120 VAC rating.
- Prevention extends valve life by cleaning the inlet screen annually, maintaining water pressure at 20–80 psi, inspecting hoses every six months, and using a water softener to reduce mineral buildup in hard-water areas.
What Is a Water Inlet Valve and How Does It Work?
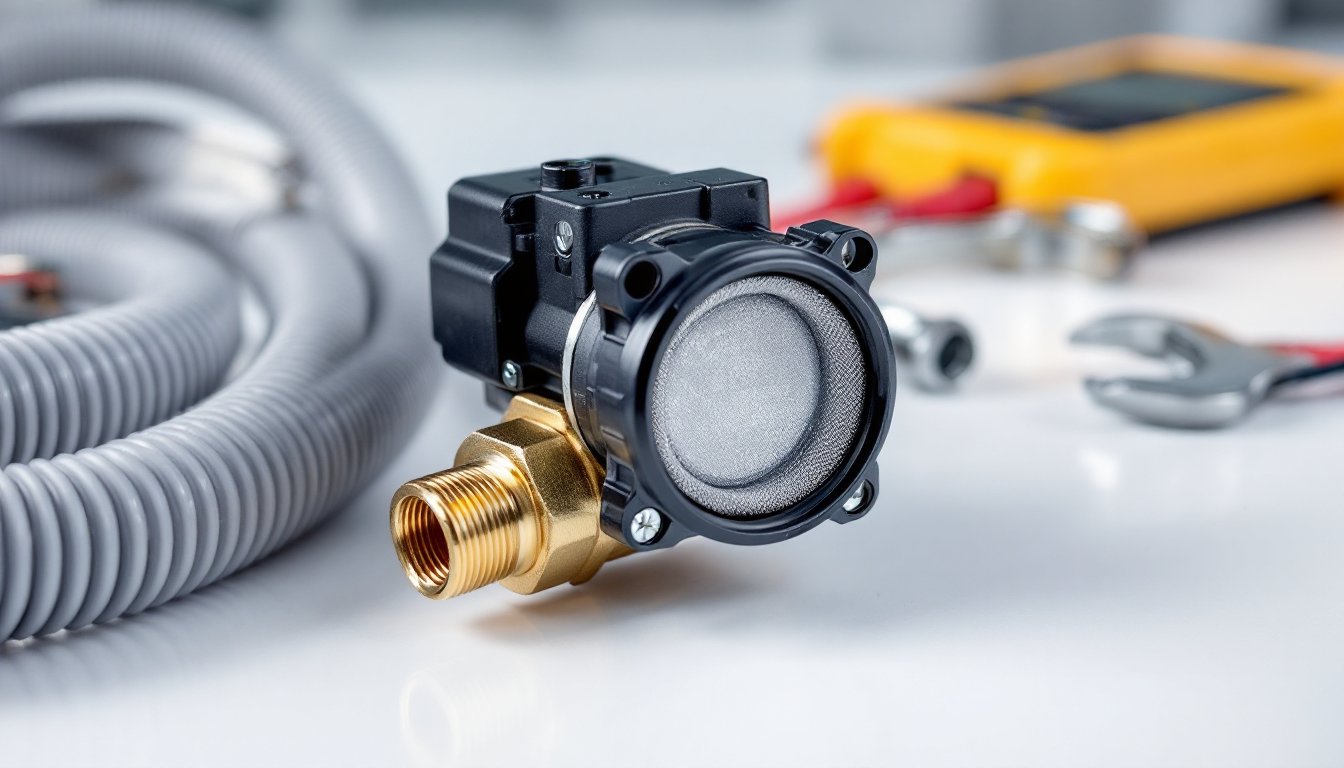
The water inlet valve is an electrically-controlled solenoid valve mounted on the dishwasher’s lower frame, typically accessed from the front kick plate or rear panel. It connects directly to your home’s water supply line and opens when the dishwasher’s control board sends a signal to start a wash cycle.
When voltage is applied (usually 120 VAC), the solenoid coil energizes, lifting a plunger or diaphragm that allows water to flow through. Once the dishwasher reaches the correct fill level, measured by a pressure switch or float assembly, the control board cuts power to the valve, and a spring closes the internal gate.
The valve has two key ports: an inlet (threaded for the supply line) and an outlet (which feeds into the dishwasher tub via a fill hose). Some GE models use a dual-inlet valve with two solenoids for different fill rates or detergent dispenser functions. Most valves require a minimum water pressure of 20 psi to open fully: if your home’s pressure is lower, the valve may not seat properly or may drip.
Signs Your GE Dishwasher Water Inlet Valve Is Failing
A failing inlet valve usually announces itself with one or more of these symptoms:
• No water entering the tub: The cycle starts, you hear the motor hum, but the tub stays dry. The valve may be clogged with sediment or the solenoid coil has burned out.
• Slow or insufficient fill: The dishwasher takes much longer than usual to fill, or it never reaches the correct water level. This often triggers an error code or causes poor wash performance.
• Continuous fill or overflow: Water keeps running even when the cycle is paused or the unit is off. A stuck-open valve or failed solenoid can flood the tub and trip the float switch.
• Leaking from the valve body: Mineral deposits or a cracked housing can cause water to seep from the valve itself, pooling under the dishwasher.
• Humming or buzzing noise: If you hear a hum but no water flows, the solenoid is receiving power but the valve gate is stuck or the screen is blocked.
If you notice any of these issues, test the valve before ordering parts. Many home maintenance checklists emphasize early detection to prevent water damage or more expensive repairs down the line.
How to Test a GE Dishwasher Water Inlet Valve
Testing the inlet valve requires basic tools and safety precautions. Always disconnect power at the breaker and shut off the water supply before starting.
Visual Inspection
- Remove the lower access panel (usually two screws at the base).
- Locate the valve, look for a brass or plastic body with a solenoid coil and two wire terminals.
- Check the inlet screen (a fine mesh filter inside the threaded inlet port). Sediment or mineral buildup here can restrict flow. Remove the supply line and gently clean the screen with a soft brush and white vinegar.
- Inspect the valve body for cracks, corrosion, or visible leaks.
Electrical Continuity Test
- Disconnect the wire harness from the valve.
- Set a multimeter to ohms (Ω) and touch the probes to the valve’s two terminals.
- A healthy solenoid coil typically reads between 500 and 1,500 ohms. Consult your model’s service manual for exact specs, some GE valves fall outside this range.
- If you get an open-line (OL) or infinite reading, the coil is burned out. If you read zero or near-zero, it’s shorted.
Water Flow Test
If the coil tests good but you still suspect a blockage:
- Disconnect the outlet hose.
- Turn the water supply back on briefly (with power still off) and observe flow from the valve’s outlet port.
- Flow should be strong and steady. Weak or dribbling flow indicates an internal obstruction or a faulty diaphragm.
For detailed step-by-step procedures, many technicians refer to guides from sources like Family Handyman to double-check wire colors and valve mounting variations across GE model families.
Choosing the Right Replacement Water Inlet Valve for Your GE Dishwasher
GE dishwashers use several inlet valve configurations, so matching the correct part is critical.
Find Your Model Number
Look inside the door frame or on the side edge of the tub for a label with the model and serial number (e.g., GDT695SSJ0SS). Cross-reference this with GE’s parts catalog or an aftermarket supplier.
OEM vs. Aftermarket
• OEM (Original Equipment Manufacturer) valves are branded GE or made by suppliers like Robertshaw. They guarantee fit and reliability but cost more, typically $25–$60.
• Aftermarket valves from brands like Supco or Tier1 are often half the price ($15–$35) and work well for most home repairs. Check reviews for reports of short coil life or poor seals.
Single vs. Dual Solenoid
Some GE models (especially those with rinse-aid dispensers or dual-zone wash arms) use a dual-solenoid valve. Count the number of wire terminals on your old valve: two terminals = single, four = dual. Using the wrong type will cause fill issues or error codes.
Inlet Thread Size
Most GE dishwashers use a standard 3/4-inch FHT (female hose thread) inlet, but verify before ordering. If your supply line has a compression fitting, you may need an adapter.
Voltage Rating
Ensure the replacement is rated for 120 VAC, 60 Hz, the North American standard. Using a valve designed for 240 VAC (common in some European models) will cause it to fail or not open.
Step-by-Step Guide to Replacing Your GE Dishwasher Water Inlet Valve
Replacing a GE dishwasher water inlet valve typically takes 30–60 minutes and requires basic hand tools. Wear safety glasses and have a towel and shallow pan ready to catch residual water.
Tools & Materials
• Replacement inlet valve (matched to your model)
• Adjustable wrench or 7/8″ open-end wrench
• Needle-nose pliers
• Flathead and Phillips screwdrivers
• Multimeter (optional, for final test)
• Teflon tape (if reusing compression fittings)
Step 1: Disconnect Power and Water
Turn off the breaker feeding the dishwasher. Shut off the water supply valve under the sink or at the main if there’s no dedicated shutoff. Disconnect the supply line from the valve inlet, expect a small amount of water to drain.
Step 2: Remove the Lower Access Panel
Unscrew the kick plate at the base of the dishwasher (usually two screws). Slide it forward and set aside.
Step 3: Disconnect Wiring and Hoses
- Unplug the wire harness from the valve terminals (squeeze the locking tab if present).
- Use pliers to loosen the hose clamp on the outlet hose (the ribbed vinyl hose leading into the tub). Slide the clamp back and twist the hose free.
- If your valve has a second inlet or a check valve, disconnect those hoses as well.
Step 4: Remove the Old Valve
The valve is typically held by a metal bracket with one or two screws. Remove the screws, slide the bracket off, and lift the valve free. On some models, the valve is clipped into a plastic mounting plate, press the tabs and pull.
Step 5: Install the New Valve
- Position the new valve in the bracket or mounting plate, ensuring the inlet port faces the supply line.
- Reattach the bracket screws.
- Reconnect the outlet hose and secure the clamp. Make sure the hose is fully seated, leaks here can cause floor damage.
- Plug in the wire harness, listening for a click.
Step 6: Reconnect Water Supply
Thread the supply line onto the valve inlet. Hand-tighten, then snug with a wrench, don’t overtighten or you’ll crack the plastic housing. If using a compression fitting, wrap the threads with Teflon tape (two or three turns, clockwise).
Step 7: Test for Leaks
Turn the water supply back on slowly and inspect the inlet, outlet, and valve body for drips. If you see seepage at the inlet, tighten slightly or add more Teflon tape. Restore power at the breaker and run a short rinse cycle to verify proper fill. Listen for the solenoid click and watch the tub fill to the correct level.
For additional tips on appliance repairs and when to call a pro, Bob Vila offers troubleshooting flowcharts and contractor referrals.
Preventative Maintenance Tips to Extend Valve Life
A little routine care can keep your GE dishwasher inlet valve working for years.
Clean the Inlet Screen Annually
Sediment, rust, and hard-water scale clog the fine mesh screen inside the valve inlet. Once a year, shut off the water, disconnect the supply line, and rinse the screen under running water. For stubborn deposits, soak it in white vinegar for 15 minutes.
Check Water Pressure
Valves need at least 20 psi to open reliably. If your home’s pressure is marginal (common in rural well systems), consider installing a booster pump or adjusting your pressure regulator. Excessively high pressure (above 80 psi) can damage the valve diaphragm, install a pressure-reducing valve if needed.
Inspect Hoses and Clamps
Every six months, pull the kick plate and check the outlet hose for cracks, kinks, or loose clamps. Replace vinyl hoses every 5–7 years or sooner if they feel brittle.
Use a Water Softener
Hard water accelerates mineral buildup inside the valve and on the screen. If you have high hardness (above 10 grains per gallon), a whole-house or under-sink softener will protect not just the dishwasher but all your plumbing fixtures.
Avoid Long Idle Periods
If you leave home for weeks, mineral deposits can harden inside a dormant valve. Run a quick rinse cycle before extended trips, or shut off the supply and drain the valve by disconnecting the outlet hose.
Conclusion
Replacing a GE dishwasher water inlet valve is a straightforward repair that restores reliable performance without the expense of a service call. By testing the valve first, selecting the correct replacement part, and following safe installation steps, most homeowners can complete the job in under an hour. Regular maintenance, cleaning screens, monitoring water pressure, and inspecting hoses, will keep the new valve running smoothly for years. If you’re confident with basic tools and willing to work methodically, this repair is well within reach.