
Working in a kitchen that’s short on square footage doesn’t mean settling for chaos or cramming utensils into drawers until they won’t close. Small kitchen cabinets, when chosen and installed with intention, can turn a cramped galley or a studio kitchenette into a functional, organized workspace. The difference between a cluttered countertop and a streamlined prep zone often comes down to the right cabinet dimensions, smart interior fittings, and a solid understanding of how vertical and corner space can be leveraged. This guide walks through the cabinet types, design tactics, and installation steps that help DIYers and homeowners make every inch count without requiring a full gut-and-remodel budget.
Table of Contents
ToggleKey Takeaways
- Small kitchen cabinets (9–18 inches wide for base units, 12–24 inches for wall cabinets) maximize storage in tight spaces without blocking pathways or overwhelming visual sightlines.
- Pull-out shelves, lazy Susans, and soft-close drawer slides transform small cabinet drawers from dead zones into accessible, organized storage solutions.
- Light finishes, flat-panel doors, and shallow-depth wall cabinets (12 inches instead of 24) make small kitchens feel more spacious and less cramped.
- Proper installation requires locating wall studs, using a ledger board for wall-mounted units, and shimming base cabinets level before securing to prevent gaps and tilting.
- Underused tricks like toe-kick drawers and bridge cabinets above refrigerators reclaim vertical real estate and deliver functional storage without expanding the cabinet footprint.
- Anti-tip brackets and quality hardware (full-extension slides rated for 75+ pounds) are essential safety features that prevent equipment failure and extend cabinet lifespan.
Why Small Kitchen Cabinets Are Essential for Compact Spaces
Standard 36-inch base cabinets and 30-inch uppers work well in traditional kitchens, but tight spaces, think urban apartments, ADUs, or older homes with narrow galley layouts, demand cabinets scaled to fit without blocking pathways or overwhelming sightlines. A small cabinet for kitchen applications typically measures 9 to 18 inches wide for base units and 12 to 24 inches wide for wall cabinets, allowing homeowners to slot storage into awkward alcoves, above refrigerators, or beside windows.
Beyond fitting the footprint, compact cabinets force better organization. When you can’t rely on cavernous shelves, you’re pushed to use drawer dividers, door-mounted racks, and pull-out trays, all of which keep everyday items accessible instead of lost in the back. This intentionality reduces visual clutter and speeds up meal prep.
From a code and safety standpoint, small cabinets rarely trigger structural concerns as long as they’re properly anchored to wall studs or floor joists. Most weigh less than full-depth units and don’t require reinforced blocking unless you’re hanging a very heavy unit (stone countertop extensions, built-in appliances). Always check local building codes if you’re relocating plumbing or electrical during a cabinet swap: permits may be required for anything beyond cosmetic changes.
Types of Small Kitchen Cabinets That Maximize Storage
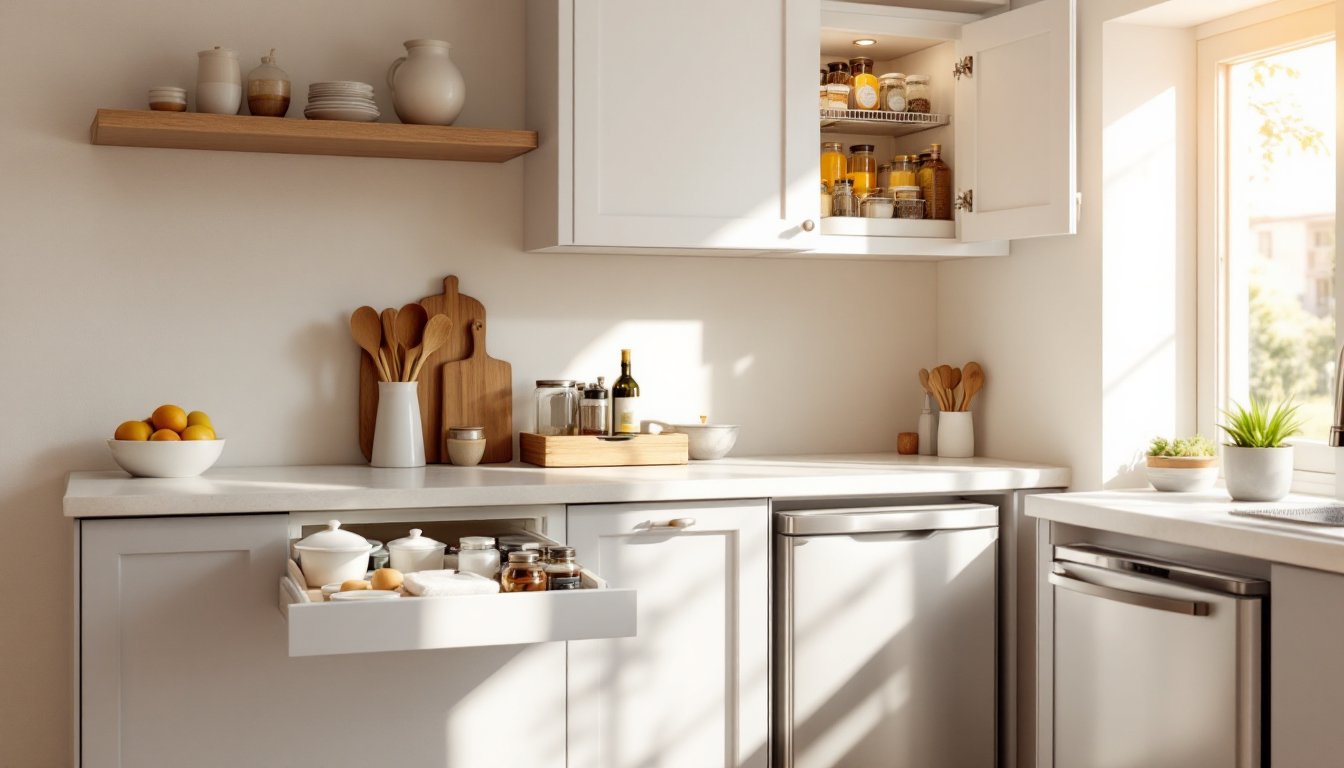
Wall-Mounted Cabinets and Upper Storage Solutions
Wall-mounted units are the workhorse of vertical storage in compact kitchens. Standard heights run 12, 15, 18, 24, 30, or 36 inches, but many stock and semi-custom lines now offer shallow-depth models at 12 inches deep instead of the typical 24 inches. This shallower profile keeps uppers from jutting into your line of sight or head space, critical in kitchens with low ceilings or narrow aisles.
When mounting, locate wall studs with a stud finder and use appropriate cabinet screws (typically #8 × 2½-inch or longer) driven through the cabinet’s hanging rail into the stud. If studs don’t align with your cabinet layout, install a ledger board, a 1×4 or 2×4 screwed horizontally into multiple studs, then hang cabinets from that. This distributes the load and simplifies leveling.
For the space above the refrigerator or range hood, a bridge cabinet (often 12 to 15 inches tall) captures otherwise wasted vertical real estate. Pair it with interior shelving or a pull-down rack system to keep seldom-used serving platters or small appliances out of the way but still accessible. Using DIY cabinet organizers with adjustable shelves helps adapt these units as your storage needs evolve.
Base Cabinets with Pull-Out Features
Small base cabinets, particularly those in the 12 to 18-inch width range, benefit enormously from pull-out shelves, pull-out trash bins, or narrow spice racks. A fixed shelf in a 12-inch cabinet turns into a black hole: a pull-out drawer or sliding wire basket brings everything into view and reach.
Look for units with full-extension drawer slides rated for at least 75 pounds. Soft-close mechanisms add a few dollars per slide but prevent slamming and extend hardware life. If you’re retrofitting an existing cabinet, measure the interior width (not the door width) to ensure your new slides and baskets will clear any center stiles or side-mount hinges.
Corner base cabinets are notorious space wasters, but a lazy Susan or a pull-out kidney-shaped tray system can recover much of that dead zone. Installation typically requires a floor-mounted pole (for lazy Susans) or side-mounted glides (for pull-out trays). Budget an extra hour for setup and adjustment, these mechanisms need careful leveling to operate smoothly.
For kitchens inspired by small-space living, integrating slim rolling carts or pull-out pantry inserts in a 9-inch gap beside the refrigerator can store oils, spices, or cleaning supplies without expanding the cabinet footprint.
Design Strategies to Make Small Cabinets Look Bigger
Finish and color have an outsized impact on perceived space. Light-toned cabinet faces, white, off-white, pale gray, or natural birch, reflect ambient and task lighting, making walls recede and counters feel less hemmed in. High-gloss or semi-gloss finishes amplify this effect but show fingerprints: satin sheens strike a balance between reflectivity and maintenance.
Avoid upper cabinets with heavy crown molding or ornate door panels in very small kitchens. Flat-panel (Shaker-style) or slab doors keep visual weight low and are easier to clean. If you love detail, save it for hardware, brushed nickel or matte black pulls add character without bulk.
Open shelving above the countertop or in place of one upper cabinet can break up a wall of doors and create the illusion of more breathing room. Just be realistic: open shelves collect dust and require tidier display discipline than closed cabinets. Use them for everyday dishes or a few decorative pieces, not for storing mismatched Tupperware.
For kitchen design inspiration, consider using glass-front cabinet doors on at least one upper unit. This introduces depth without adding physical space, especially when the interior is painted the same color as the walls. Interior LED puck lights or tape lights further enhance the effect and improve visibility.
Toe-kick drawers, shallow pull-outs installed in the 4-inch recess below base cabinets, are an underused trick for stashing baking sheets, cutting boards, or flat lids. They require careful measurement (the drawer box must clear the cabinet’s structural framing) and European-style undermount slides, but they deliver storage that genuinely feels like found space.
DIY Installation Tips for Small Kitchen Cabinets
Start by verifying your walls are plumb and your floor is level. Use a 4-foot level on multiple wall sections: out-of-plumb walls will cause cabinets to tilt or leave gaps. If the floor slopes more than ¼ inch over 4 feet, you’ll need shims under base cabinets to level them before securing.
Materials and tools for a typical small-cabinet install:
• Cabinets (pre-assembled or RTA ready-to-assemble)
• Stud finder and pencil
• 4-foot level and combination square
• Drill/driver with #2 Phillips bit and ⅛-inch pilot bit
• Cabinet screws (#8 × 2½-inch for wall cabinets, #8 × 1½-inch for face-frame joining)
• Shims (composite or wood)
• Clamps (bar or spring clamps)
• Safety glasses and work gloves
• Painter’s tape for layout lines
For wall cabinets, mark a level reference line at the desired height (standard is 54 inches from the floor to the cabinet bottom, giving 18 inches of backsplash clearance above a 36-inch counter). Locate and mark studs along that line. Install a temporary ledger board, a straight 1×3 or 1×4 screwed into studs just below your reference line, to support the cabinet while you drive mounting screws. This is especially helpful when working solo.
Hang the first cabinet, driving screws through the top and bottom hanging rails into studs. Check level in both directions, shimming behind the cabinet if needed. For adjacent cabinets, clamp the face frames together, then drill pilot holes and join them with 1¼-inch screws before securing to the wall. This keeps the fronts flush and prevents gaps.
Base cabinets should be shimmed level front-to-back and side-to-side. Once level, screw through the cabinet back into wall studs and through the bottom rail into the floor if your cabinet design allows. Cut shims flush with a utility knife or oscillating multi-tool.
If you’re adapting modular units from big-box stores, double-check the hardware pack, some RTA kits skimp on screws or omit wall anchors. Pick up a box of quality cabinet screws and a few toggle bolts for drywall sections without stud backing.
Countertop considerations: If you’re topping small base cabinets with butcher block, laminate, or stone, ensure the cabinet frame is rigid enough to support the material. Thin particleboard backs may need a plywood reinforcement strip screwed to the top stretcher. Stone slabs heavier than 100 pounds should have additional cleat support or corbels, consult the fabricator’s installation guide.
Safety notes: Always wear safety glasses when drilling overhead or cutting materials. If you’re working above shoulder height for more than a few minutes, use a sturdy step stool or ladder with a tool tray, reaching and balancing on an office chair is a common cause of falls. If cabinets came with anti-tip brackets (common for tall pantry units), install them: they’re required by most manufacturers’ warranties.
Conclusion
Small kitchen cabinets aren’t a compromise, they’re a deliberate strategy for making tight spaces work harder. By choosing the right dimensions, leveraging pull-outs and vertical storage, and installing with attention to level and stud placement, DIYers can achieve a kitchen that feels organized and open, not cramped. Measure twice, shim as needed, and don’t skip the ledger board when hanging uppers solo. The payoff is a kitchen that proves square footage matters less than smart planning.